The Cricut Maker machine is one of the most versatile and advanced crafting devices. This device has a plethora of features and has a great design. I have been using this machine for a long time now. And I always prefer this machine for DIY crafting to any other cutting machine available on the market. To complete the setup of this machine, it is necessary to establish a Bluetooth connection. However, many users do not know the process to connect Cricut Maker 3 to Bluetooth. If you also want to learn the Bluetooth connection process on Windows, Mac, Android, and iOS, keep reading this content until the end.
The Process to Connect Cricut Maker 3 to Bluetooth on a Computer
The Cricut Maker machine can connect via Bluetooth to Windows and Mac computers. So, below are the guides you can use on your respective device to complete the connection process.
Windows
- Please turn on your Cricut Maker machine and ensure that it is within 15 feet range of your Windows device.
- Now, move to your Windows device and access the Devices window from settings.
- Next, check if the Bluetooth option is ON and then select Add Bluetooth or another device.
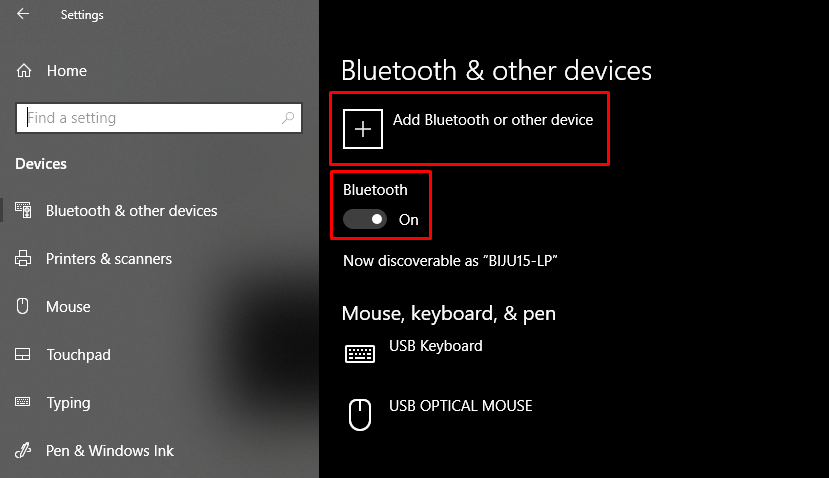
- On the next page, choose Bluetooth to scan for your Maker machine.
- When your Cricut machine name appears on the screen, then select it.
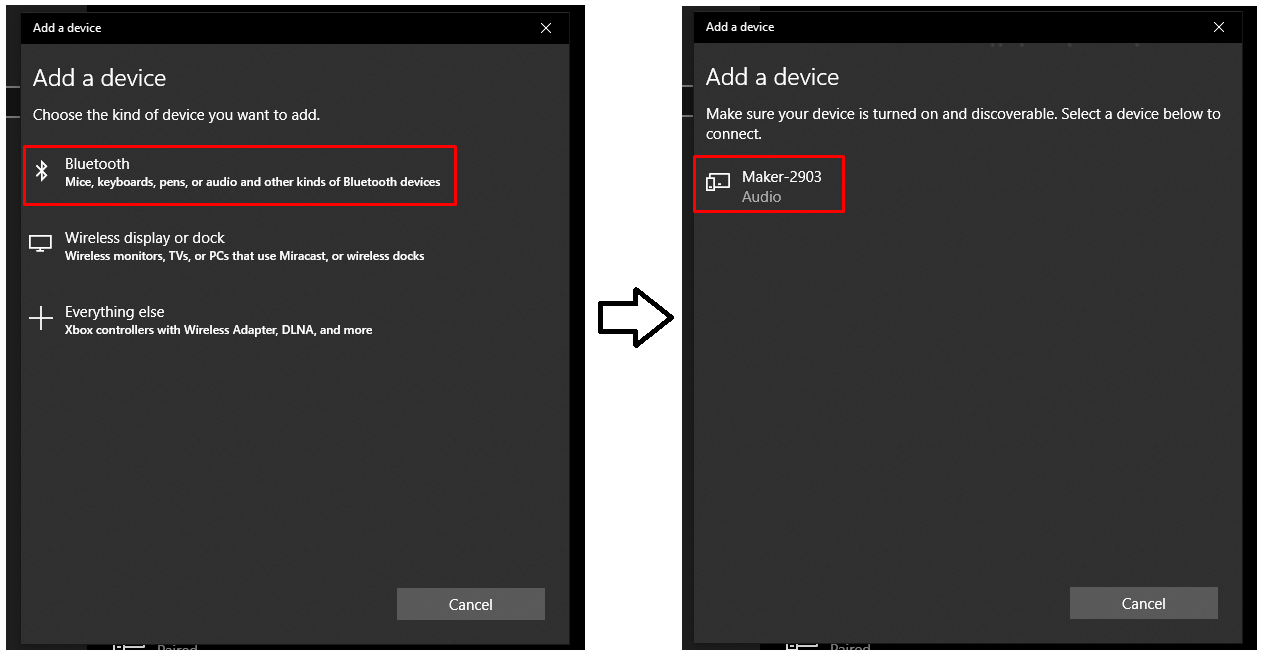
- Wait for the Bluetooth pairing of the machine to complete.
- After that, you can go to the Cricut Design Space app to complete the machine setup.
Mac
- Before you switch on your Cricut Maker machine, place it within a 15-foot range of your Mac device.
- Now, move to the Apple Menu and choose the System Preferences option.
- Next, on the open window, click on the Bluetooth option.
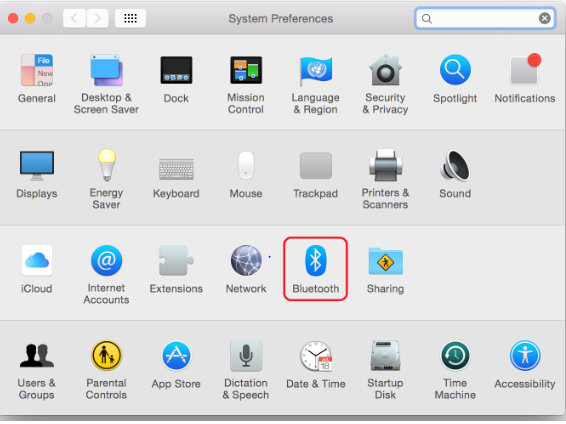
- Afterward, ensure the Bluetooth option is enabled, and then select the Maker machine name when you see it on the screen.
- Finally, Bluetooth pairing of both devices will be complete.
If you want to perform the Cricut Maker machine setup process, then download or open the Cricut app and select the option Machine Setup.
Must Read: How to Setup Cricut Maker 3
The Process to Connect Cricut Maker 3 to Bluetooth on a Smartphone
If you want to connect the Cricut Maker 3 machine via Bluetooth to an iOS or Android device, then here are the easy procedures you can follow.
iOS
- Keep the Maker machine near your iPhone/iPad, then turn it On.
- From the home screen of your iOS device, choose the Settings option.
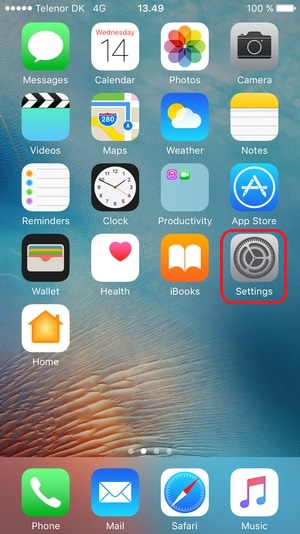
- Now, please move to the Bluetooth toggle and ensure that it is On.
- When the machine name appears on the screen, then click on it.
- After that, the Bluetooth connection between both devices will be complete.
- Furthermore, download and install the Cricut app to complete the machine setup process.
Android
- Ensure that your Cricut Maker machine is within the 10-15 feet range of your mobile phone.
- After that, please turn on the machine by plugging it into a power source and pressing the power button.
- Now, open the Settings window on your Android device and go to Bluetooth.
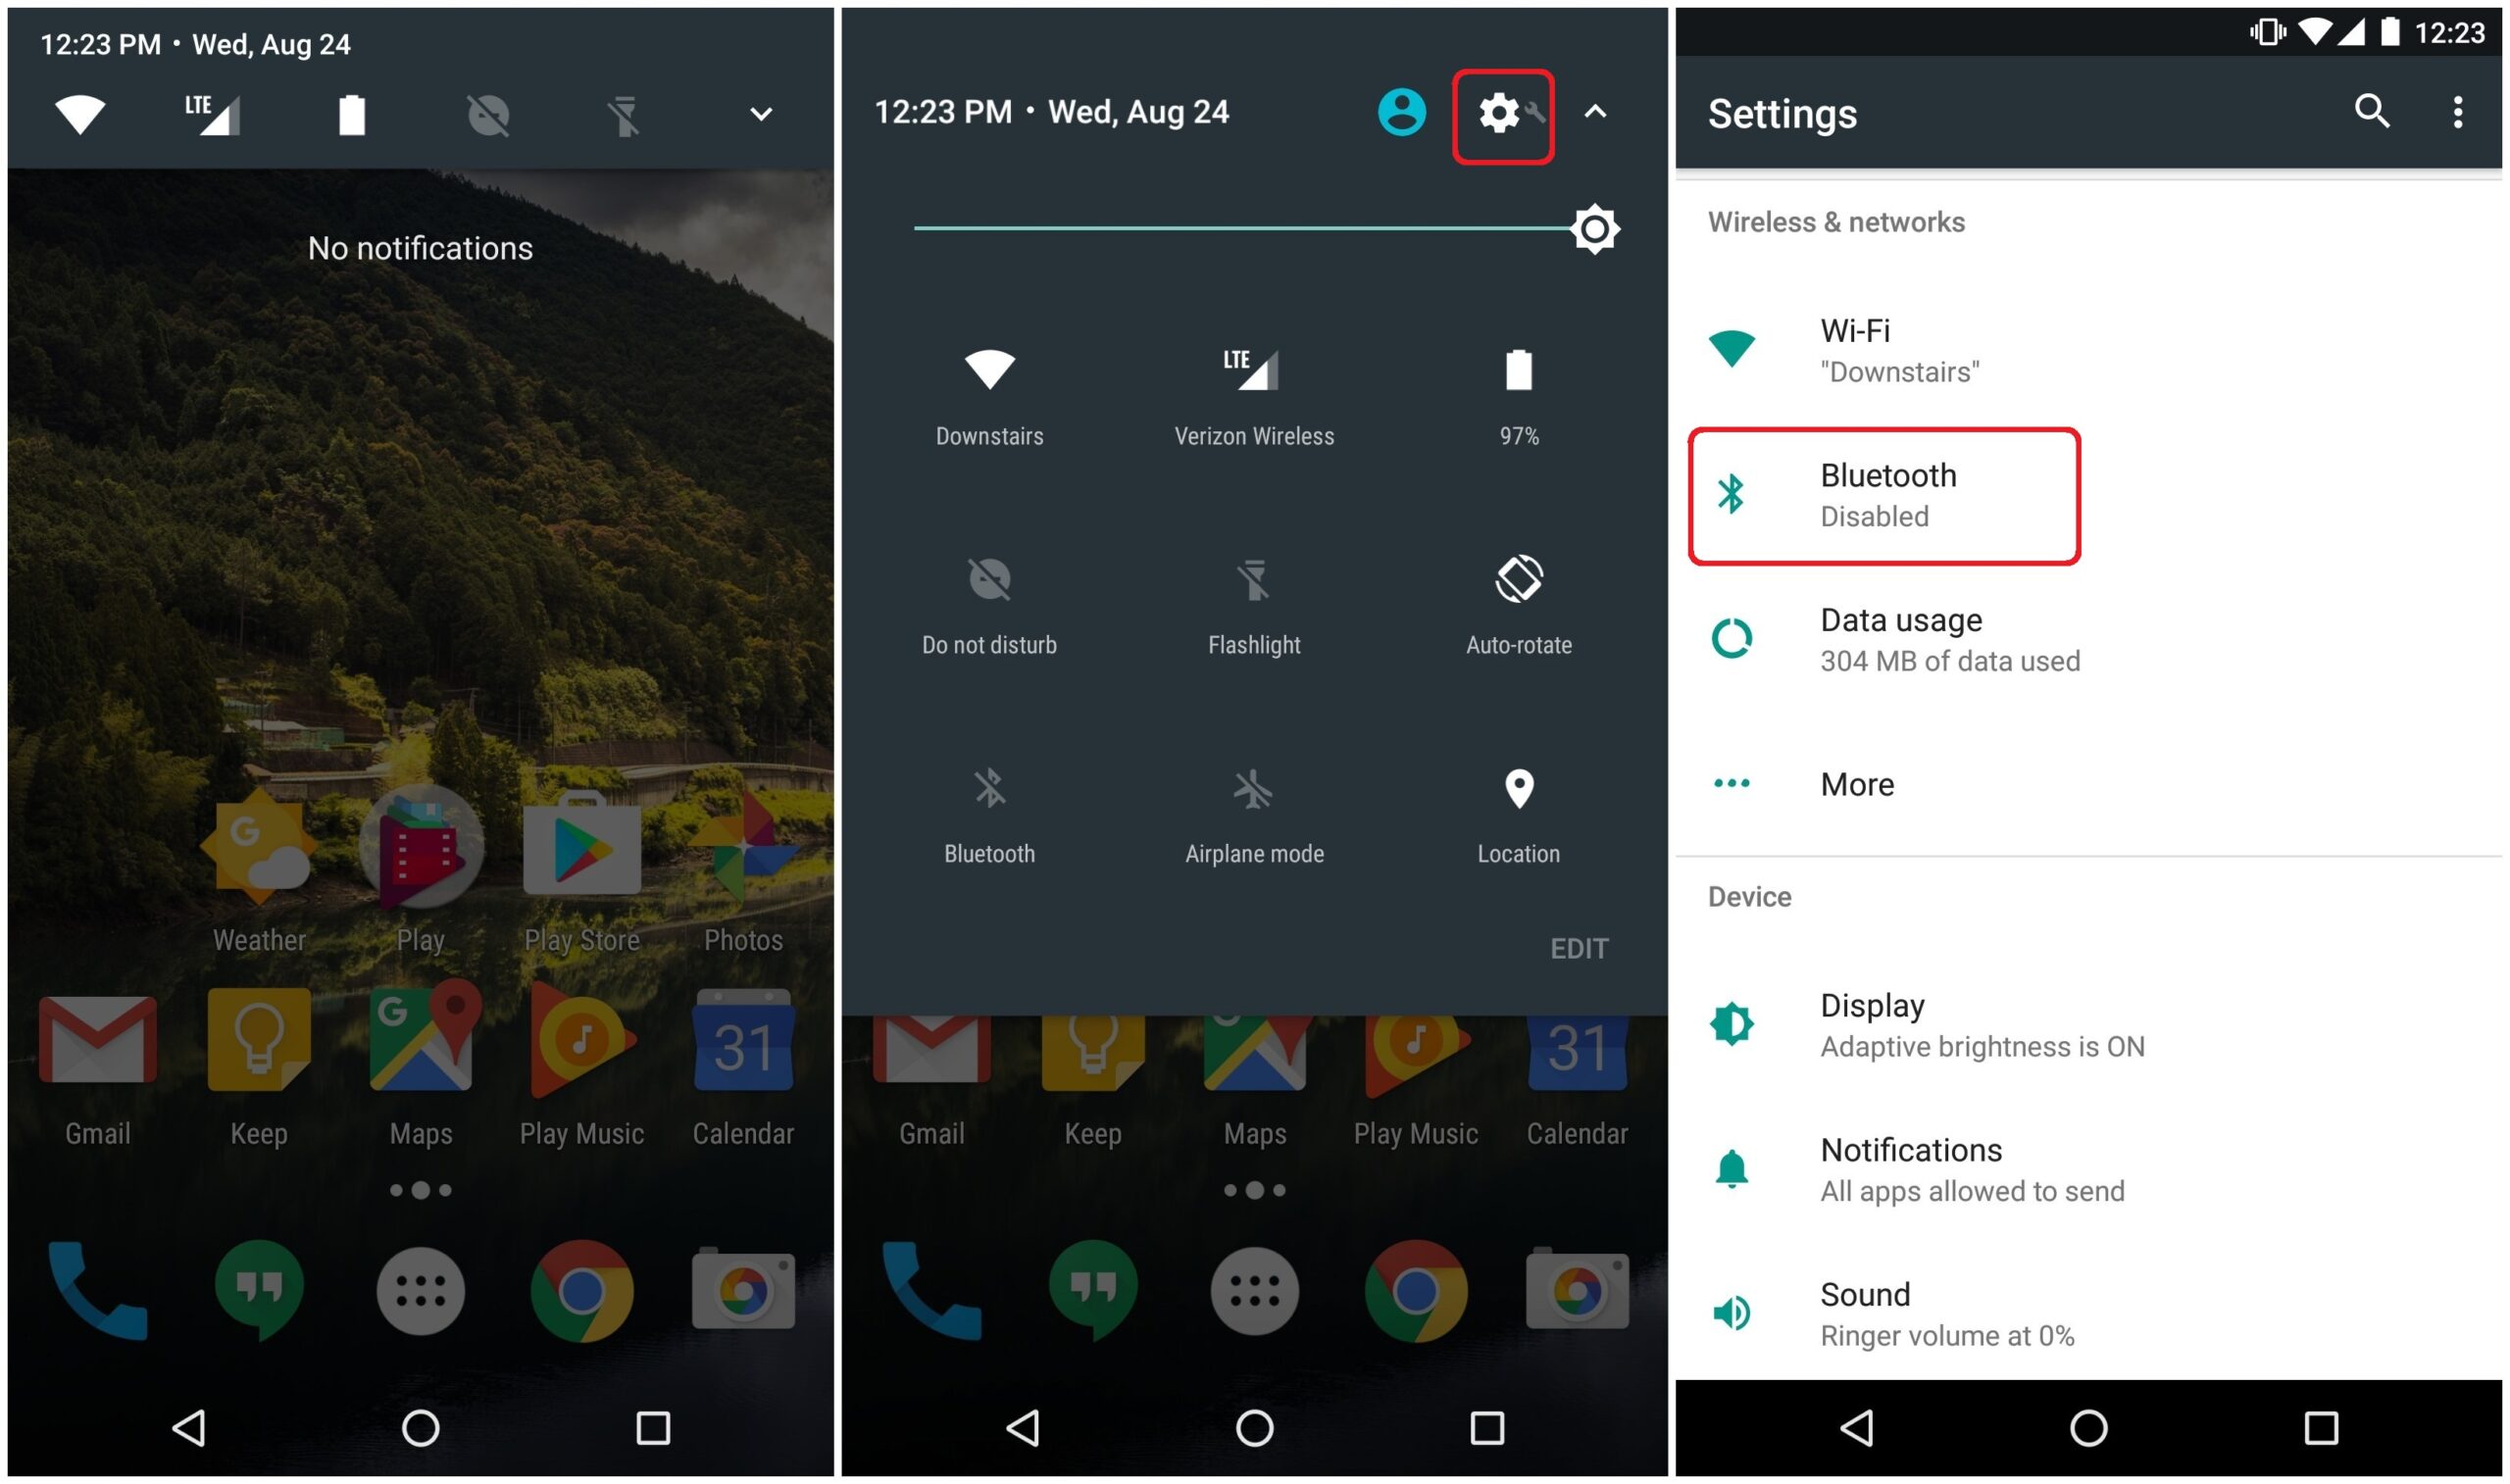
- When you turn on the Bluetooth, your device will start searching for nearby Bluetooth devices.
- Once your Cricut Maker machine name appears on the screen, then click on it.
- Lastly, your Cricut machine and Android device will be connected via Bluetooth.
Conclusion
Here, you learned about the complete guide to connect Cricut Maker 3 to Bluetooth. You can use the Bluetooth connection process based on the OS device you are using. If you face any issues on the first attempt, then carefully follow the process once again. If the problem persists, then you can contact the Cricut customer care team to clear your queries. In addition, if you require more profound help, then connect to a team of Cricut experts to get instant solutions.
/*! elementor – v3.20.0 – 11-03-2024 */
.elementor-heading-title{padding:0;margin:0;line-height:1}.elementor-widget-heading .elementor-heading-title[class*=elementor-size-]>a{color:inherit;font-size:inherit;line-height:inherit}.elementor-widget-heading .elementor-heading-title.elementor-size-small{font-size:15px}.elementor-widget-heading .elementor-heading-title.elementor-size-medium{font-size:19px}.elementor-widget-heading .elementor-heading-title.elementor-size-large{font-size:29px}.elementor-widget-heading .elementor-heading-title.elementor-size-xl{font-size:39px}.elementor-widget-heading .elementor-heading-title.elementor-size-xxl{font-size:59px}
Frequently Asked Questions
/*! elementor – v3.20.0 – 11-03-2024 */
.elementor-accordion{text-align:left}.elementor-accordion .elementor-accordion-item{border:1px solid #d5d8dc}.elementor-accordion .elementor-accordion-item+.elementor-accordion-item{border-top:none}.elementor-accordion .elementor-tab-title{margin:0;padding:15px 20px;font-weight:700;line-height:1;cursor:pointer;outline:none}.elementor-accordion .elementor-tab-title .elementor-accordion-icon{display:inline-block;width:1.5em}.elementor-accordion .elementor-tab-title .elementor-accordion-icon svg{width:1em;height:1em}.elementor-accordion .elementor-tab-title .elementor-accordion-icon.elementor-accordion-icon-right{float:right;text-align:right}.elementor-accordion .elementor-tab-title .elementor-accordion-icon.elementor-accordion-icon-left{float:left;text-align:left}.elementor-accordion .elementor-tab-title .elementor-accordion-icon .elementor-accordion-icon-closed{display:block}.elementor-accordion .elementor-tab-title .elementor-accordion-icon .elementor-accordion-icon-opened,.elementor-accordion .elementor-tab-title.elementor-active .elementor-accordion-icon-closed{display:none}.elementor-accordion .elementor-tab-title.elementor-active .elementor-accordion-icon-opened{display:block}.elementor-accordion .elementor-tab-content{display:none;padding:15px 20px;border-top:1px solid #d5d8dc}@media (max-width:767px){.elementor-accordion .elementor-tab-title{padding:12px 15px}.elementor-accordion .elementor-tab-title .elementor-accordion-icon{width:1.2em}.elementor-accordion .elementor-tab-content{padding:7px 15px}}.e-con-inner>.elementor-widget-accordion,.e-con>.elementor-widget-accordion{width:var(–container-widget-width);–flex-grow:var(–container-widget-flex-grow)}
Why Is My Cricut Maker 3 Not Connecting to Bluetooth?
In various situations, you may be unable to connect the Cricut Maker 3 machine to a Bluetooth device. The problem can arise due to device incompatibility, devices being far from each other, following the wrong connection procedure, and others. If you are having any issues connecting your device, check all the earlier-mentioned points and try again. If the problem persists, then go to professional help.
Which Devices Connect to Cricut Maker via Bluetooth?
Cricut Maker is a fantastic device that comes with both wired and wireless connectivity options. Crafters can connect this machine to both computer and smartphone devices. This cutting machine easily connects to Windows, Mac, iOS, and Android devices via Bluetooth. However, it does not work with Chromebooks. Plus you can also use the USB cable if you want to establish the wired connection between the machine and your PC/smartphone.
How to Connect Cricut Maker 3 to Bluetooth on a Mac?
You can follow these steps if you want to connect Maker 3 to a Mac via Bluetooth.
- First, switch on the Cricut Maker machine and keep it within 15 feet of the Mac device.
- After that, open the System Preferences window on your Mac device.
- Next, choose the Bluetooth option on the open page.
- After that, your Mac device will start searching for nearby Maker machines.
- Once the right machine name shows up on the screen, click on it.
Lastly, the Bluetooth connection process of your Cricut Maker and Mac device will be complete.

