Home > Help Guides  
How to Make Mugs With Cricut Maker for Office?

How to Make Mugs With Cricut Maker for Office?

Cricut mugs are just fantastic; who doesn’t like a customized mug? Well, I am fond of coffee mugs, and I create them for myself with my Cricut machine. I have a Cricut Maker, but you can use any Cricut machine to make designs. Are you ready to learn how to make mugs with Cricut for the office? If yes, then stick to this guide till the end.

How-to-make-mugs-with-Cricut

However, you have to use a Cricut Mug Press to create the final customized mug using your Cricut machine. If you want to make your own mug, first, you will need to create a design with Cricut Design Space to transfer it to your mug. To get started with this project, read my guide to the end to get an idea of how to make a customized mug with your Cricut machine. Here we go!

Tools and Supplies You Will Need for Your Cricut Project

There is a set of necessary materials that you need to make a customized mug with your Cricut Maker machine. Look at the list of them. 

  • A computer 
  • Cricut Mug Press 
  • Lint roller 
  • Infusible ink transfer sheets 
  • Infusible ink markers and pens 
  • Heat resistant tape 
  • Butcher paper 
  • Laser copy paper 
  • Oven glove 

All these materials are necessary to start your Cricut mug project. Let’s learn how to make a mug with the Cricut Maker machine. However, if you haven’t set up your Cricut Maker machine, watch this video to learn it:

How to Make Mugs With Cricut Cutting Machine?

When you are all set for the Cricut mug, you need to follow specific steps to make a customized Cricut mug. So, let’s go through the below steps to get started.

Step 1: Create Your Design in Design Space

The first and foremost step is to create the desired design on your Cricut Design Space software. If you haven’t downloaded it, you can do it easily via Cricut’s official website. You can get this software either on your desktop or Android. However, a desktop would be best to create a design.

Create-Your-Design in-Design-Space

Once you are on the Design Space canvas, you will see various options to create your design. Otherwise, you can also take the file from outside and then upload it on your canvas. 

Note: Don’t forget to mirror your design before you cut it.

Step 2: Cut Your Design

When you are ready with your mug design, you can now cut your design by hitting the “Make It” button. However, before that, you will have to place an infusible ink sheet on your Cricut mat and then load it into your Cricut Maker machine. Users should note that they can use any Cricut machine to cut the design. Once your design is cut, remove the excess material utilizing a wedding tool.

Cut-Your-Design

Step 3: Heat the Mug With Cricut Mug Press

Once your design is ready, you need to clean the mug using rubbing alcohol and cotton. Ensure that your Cricut mugs are compatible with the infusible ink. So, you must use the mugs that are meant to be used for sublimation. Now, you can use the following steps to finalize the project.

  1. First of all, ensure that your mug is clean and free from any dust and dirt. 
  2. Then, apply your design around the mug.
Heat-the-Mug-With-Cricut-Mug-Press
  1. Now, place your Cricut Mug Press on a heat-resistant surface. You can use an EasyPress mat too. 
  2. After that, turn on the Mug Press and wait for the button to light green color. 
  3. A beep will occur, indicating that the machine is ready to use. 
  4. You don’t have to select the temperature, as the press can automatically select the temperature. 
  5. Next, place the mug into the Criuct Mug Press.
How-to-Engrave-Acrylic-with-Cricut-Maker
  1. Now, wait for a few minutes to allow the sublimation. 
  2. When you hear the beep’s sound, it means that the project is complete. 
  3. At last, power off your machine and take the mug out using your oven gloves.
How-to-Engrave-Acrylic-with-Cricut-Maker

Finally, you have learned how to make mugs with Cricut Maker for the office using Cricut Mug Press.

Conclusion

It was fun to make a customized mug using your Cricut Maker machine and a Cricut Mug Press. I know the process may be a little trickier, but with practice, you can make a perfect personalized mug. You don’t have to worry about the designs, as the Design Space has various features and designs to create any design you want. Therefore, if you understand how to make mugs with Cricut, you are good to go to make one.

FAQs

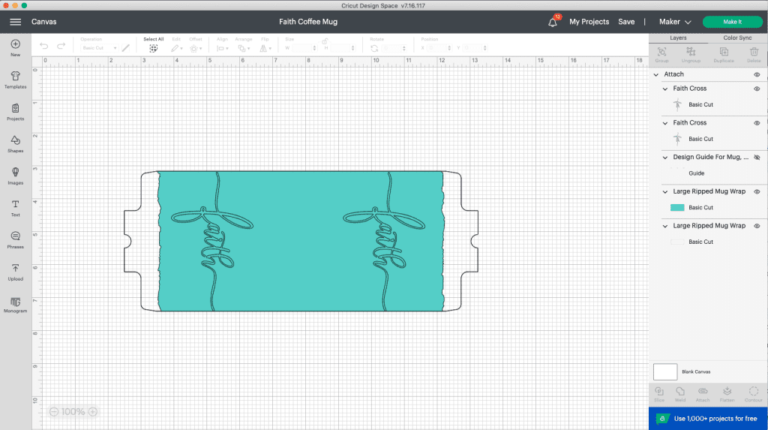
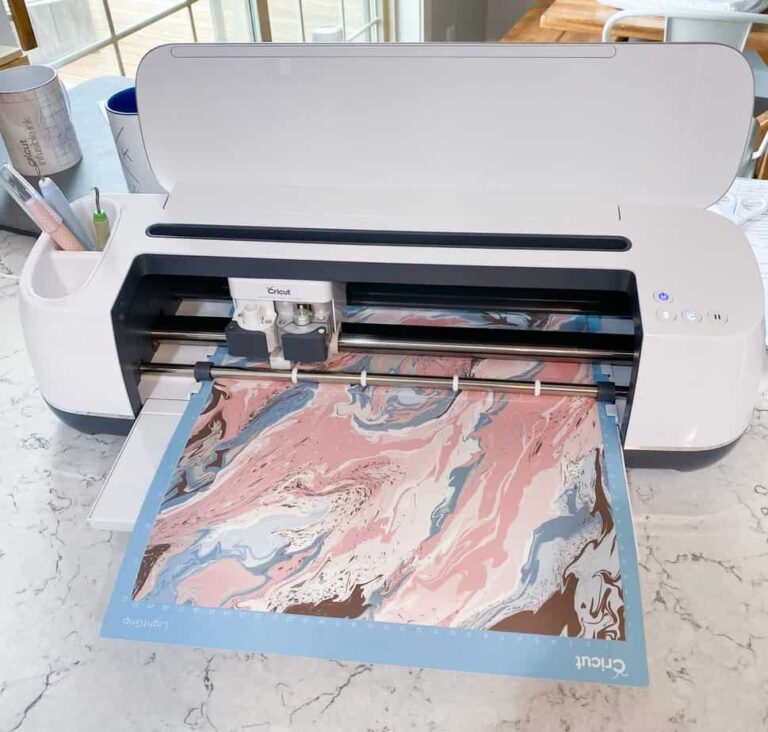
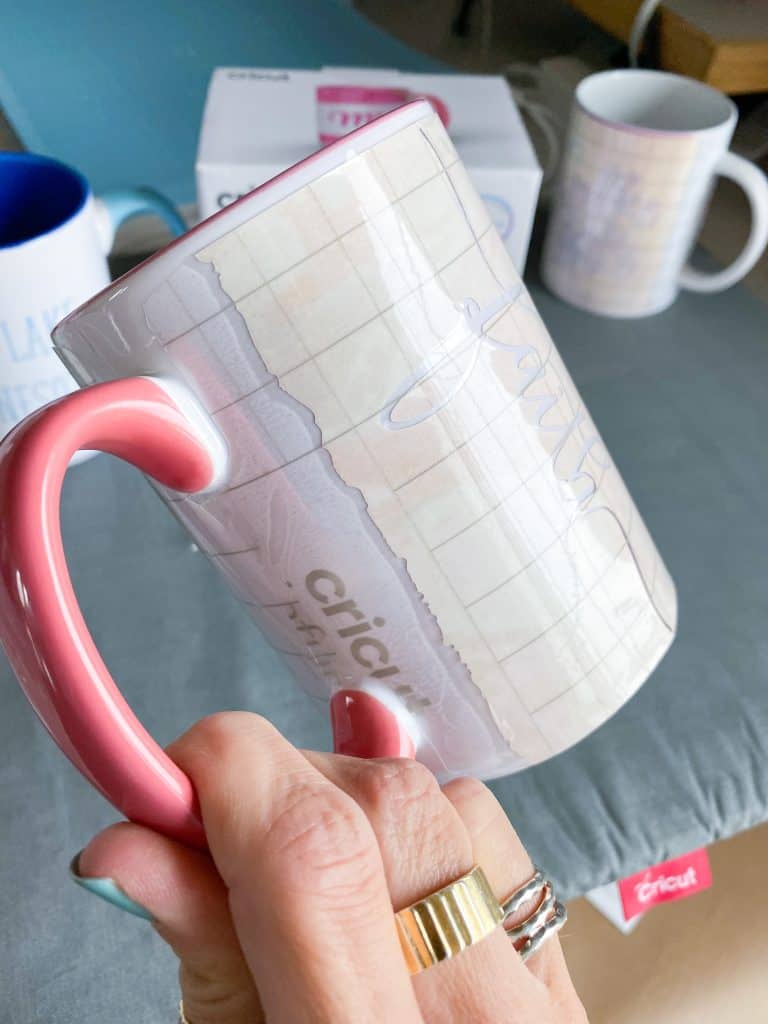
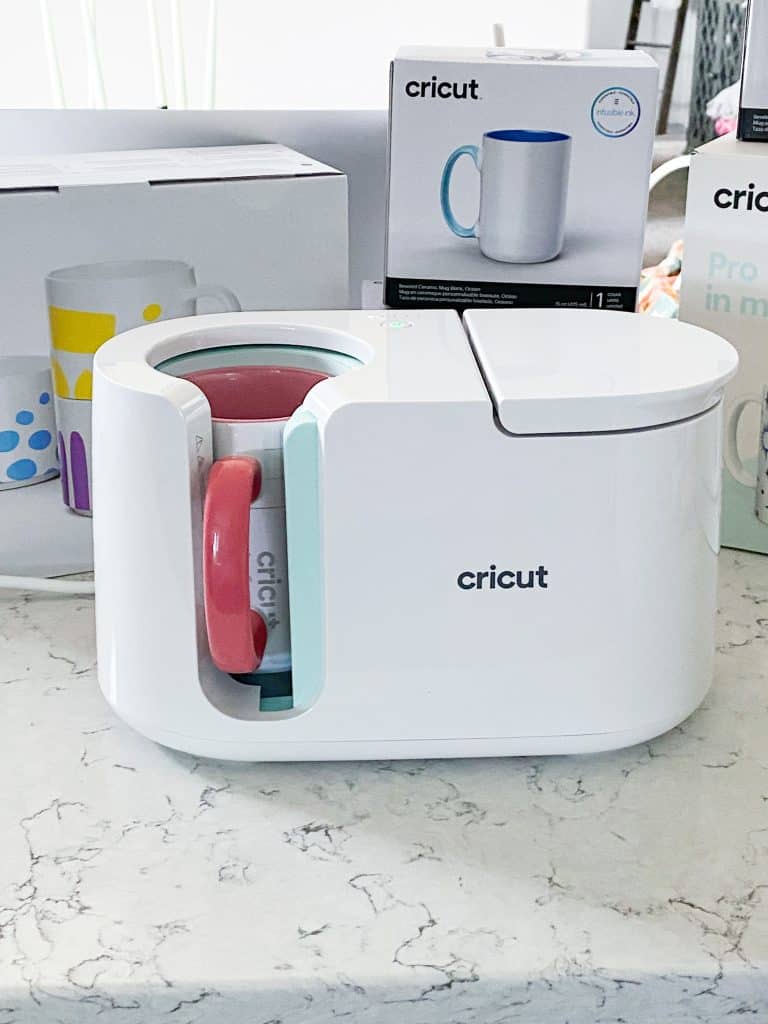
To make a mug with Cricut’s infusible ink, you first need to create a design using the Cricut Design Space. Then, you have to cut the design by using your Cricut machine (Cricut Maker, Explore series, or Cricut Joy). To cut the design, you are required to load the infusible ink sheet on the Cricut mat and then load it into your Cricut machine. After cutting the sheet, remove the extra material from it. Now, apply it around your mug and place it in your Cricut Mug Press. Once the project is done, it will make a beep sound.

Creating a customized mug without Mug Press can be challenging. However, Cricut infusible ink can design Cricut sublimation mugs and doesn’t need a heat press such as a Mug Press. But you can make this project in the comfort of your home with an oven. Set the range to a temperature as described in the heat guide. Now, you will get a customized mug.

No, you cannot use any mug with your Cricut Mug Press. That mug should have a ceramic plating to adapt to the changes in temperature. Therefore, you always choose cups from the Cricut store. However, you can also select any mug with a ceramic plating inside. One more thing: ensure that your mug size is according to the size of your Mug Press.